Docker
Instructions
Install Docker
Check Processor support for Docker (Click to expand)
In order to run docker you must be able to support virtualization from your CPU. This feature must also be enabled within your BIOS and Windows Features.
If you’re unsure whether docker is supported by your specific cpu, please visit and input your specific model number:
Type Your Model Number, e.g. T6500 into the product search bar

- width:
100%
In this example above, you can see that Vt-x (Virtualization) is not supported. This will be a Yes if it is supported.
On Linux you can find the processor by typing on the command line:

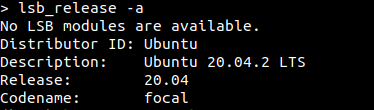
Make sure that you select the appropriate distribution for your machine. If you are unsure of your distribution use lsb_release -a from the command line to check your distro.
Note
You can retrieve a basic install script for a fresh environment that can be found here It is primarily intended for newly flashed Ubuntu systems. This script will work for both ARM64 and AMD64 processors
It will set up Docker, Download Basestack, CUDA, and MinKNOW
Docker Installation
Choose ONE option
- A. Rootless - RECOMMENDED
- https://docs.docker.com/engine/security/rootless/
If you already have docker installed, see documentation on [docker context](https://docs.docker.com/engine/security/rootless/#client) to switch between rootless and rootful
- B. Rootful (gives root access, use if you already have docker installed or use it regularly)
- https://docs.docker.com/engine/install/ubuntu/
Required to map you user permissions appropriately for generated files.
Recommended for most rootful-specific personal systems running Docker
- Post-Installation Steps:
- Create Docker group
sudo groupadd docker
- Add your user to the docker group
sudo usermod -aG docker $USER
- Ensure all root-created files map as your user id in docker containers and volumes (Do both of these)
1.
sudo sed -i "1s/^/$USER:$(id -u):1\n/" /etc/subuid2.
sudo sed -i "1s/^/$USER:$(id -g):1\n/" /etc/subgid
- Create Docker container namespace CHOOSE ONE
- a. echo $(jq –arg user “$USER” ‘. += {“userns-remap”: $user}’ /etc/docker/daemon.json) > ~/daemon.json && sudo mv ~/daemon.json /etc/docker/daemon.json
If you dont have the file already created (isn’t created by default)
- b. Manually add your user by following the instructions here: https://docs.docker.com/engine/security/userns-remap/.
You can disable the userns-remap functionality by deleting the daemon.json file described above or removing the line attributed to your user
- Check that the subgid and subuid files are correct. Order of these lines matters in that the <username>:<uid>:1 must come first in each file
- 1.
cat /etc/subuid -
<username>:<uid>:1-<username>:100000:65536
- 1.
- 2. cat /etc/subgid
-
<username>:<uid>:1-<username>:100000:65536
- Restart Docker
a.
sudo service docker restartb. OR Restart your computer/session
- Ensure that permissions are appropriate
1.
docker run -v /tmp:/opt/tmp nginx touch /opt/tmp/test.txt- 2.
ls -lht /tmp/test.txt ^ ensure that ownership is your uid/gid or username:group
- 2.
sudo usermod -aG docker $USER
sudo sed -i "1s/^/$USER:$(id -u):1\n/" /etc/subuid
sudo sed -i "1s/^/$USER:$(id -u):1\n/" /etc/subgid

if [[ -s "/etc/docker/daemon.json" ]]; then
        cat "/etc/docker/daemon.json" | jq --arg USERNS $USER '."userns-remap" = $USERNS' > /tmp/daemon.json
        sudo mv /tmp/daemon.json /etc/docker/daemon.json
else
        echo "{\"userns-remap\": \"$USER\"}"  | sudo tee -a /etc/docker/daemon.json
fi
Open a terminal and type docker info. You should see information about your docker service

Rootful: - /var/lib/docker is the Docker Root Dir. YOU MUST correctly utilize the userns-remap configuration described above for this to work
Rootless: - $HOME/.local/share/docker (or something similar in $HOME) will be the Docker Root Dir.
Additionally, for Docker Rootless only, you’ll need to adjust the socket that Basestack is connecting to directly within the System tab of the application. This value will be wherever your docker.sock file is made.

If you’re unsure where that is run: docker context ls and it will be the DOCKER ENDPOINT value sans the unix://

Basestack
Install Main
Download Basestack from Releases
You will select the item labeled
<Basestack-Version>.<arch>.AppImage
Double-click
<Basestack-Version>.<arch>.AppImageFollow the prompts for installing the software. Choose defaults unless otherwise needed.
chmod ugo+x
<Basestack-Version>.<arch>.AppImage